Blog 6: Operating Principle and Mechanism Design👩🔧🛠
- Valarie Goh
- Aug 5, 2022
- 5 min read

Yo everyone welcome back to my blog today!!!😎🤟

Remember to check out my previous blog on a journey in 3D printing and egg challenge. If you have not read it, you are missing out a lot so please do check it out. Below is the link:

Today I will be showing how we created/designed the shooting and load mechanism for the ping pong ball shooter🔫 in week 13's lesson which is Operating Principles & Mechanism🛠
and.....

Last but not least Practical 4 on the marble run 🤗which is our last Practical sadly🥲 in the workshop.

So keep reading📖 okieee.....
Let's start on the theory part which is a bit boring🤧 but a quick one 😶🌫️so let's get into it:
Operating Principle and Mechanism Design

Operating principle⚒️
All devices, apparatus, and equipment are designed based on working principles that are either mechanical, electrical, chemical, or magnetism.
Examples in everyday devices💻:
Steam traps operate on the principle of specific gravity🔎
Foil shavers work based on reciprocating motion👀
Air-lift pump (such as the one inside a coffee maker) works on the principle of buoyancy💨
Brewing coffee involves the leaching of coffee solubles☕️
Centrifugal pumps impart energy to the liquid by means of a centrifugal force developed by the rotation of an impeller.💦

Mechanism Design⛓️
The mechanism enables & enhances principle. In order for the identified operating principle to work efficiently, mechanical movements are often required.

In Chemistry🧬,
Mechanisms are the fundamental chemical processes involved in or responsible for an action, reaction, or other natural phenomena.

In Engineering👷♀️👷♂️,
Mechanism refers to the combination of rigid or resistant bodies, formed and connected so that they move with definite relative motions with respect to one another. More simply, it is something that transforms forces and movement into a desired set of output forces and movement.
6 Essential Mechanism in functional prototypes👩🔧🧑🔧
Actuators
Converts stored energy into motion.
The stored energy is usually in the form of compressed air, electrical potential, or liquid pressure.
3 principal types: electric, pneumatic and hydraulic.

Cams
Convert the rotation of a shaft into simple or complex reciprocating linear motion. They can be sliding or rotational pieces in a mechanical linkage.
Gears

Transmit torque and adjust rotational velocity.
Many different types: spurs, helical, worm, planetary, and bevel gears, etc.

Lever
Transmit and amplify force by fixing the input and output about a fulcrum or pivot point.

Ratchets
They lock in one direction, allowing them to tighten without fear of literally "going backward."
Example: Cable ties

Springs
Store and dissipate energy.
Many types: compression, extension torsion, plate, constant force and etc.
CA2 Report Part 4 Mechanism Design

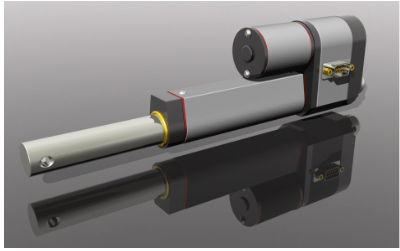
Let us go on to the FUN PART 🥳of the ACTIVITY hahaha... so we were tasked to design a ping pong (table tennis) ball launcher that can shoot and reload ping pong balls and the device should be able to hold at least 5 ping pong balls.

So instead of thinking together my group decided to do a mini competition among our group that sees who have the better drawing skills for the gun so we decided to come up with different IDEAS of gun designs therefore this is our overall group drawings below:
Eshvin | Asraf | Insyirah | Valarie |
 |  |  |  |

COLLATED MASTERPIECE


Guess who won hahaha...
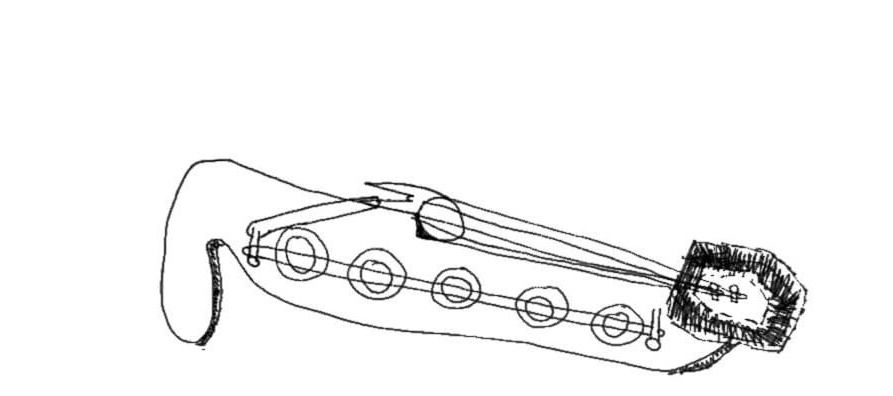
So as you can see from the drawing clearly, Eshvin's sketch is not that great and Asraf's one was better than Eshvin so it comes down to mine and Insyirah's.
Therefore, we let Mr. Ting and some of our classmates choose like Jiaxin and Keanu so they have chosen my sketch although my sketch and Insyirah's are the same, for some reason in terms of aesthetics wise mine looks better😂. (by the way, my drawing skills are really bad and I was surprised)
This is the video that shows the gun function that I sketched out in action🔫

Annotated Gun Mechanism

CA2 Report Part 4 Mechanism Design

Let's move on to the next objective which is Practical 4 woohoo...

Practical 4
For practical 4, my group and I were tasked to design and build a cardboard structure that incorporates a manually operated mechanism to keep a marble in continuous motion for at least 30 seconds. We have to make a Marble run machine out of cardboard as a team in 2.5 hours in workshop W319.

Requirement:
The cardboard structure must incorporate one manually operated mechanism.
The structure must be able to keep a marble (average diameter: 22 mm) in continuous motion for at least 30 seconds
The structure should not be more than 100cm x 100cm x 100cm
The structure should be made predominantly of corrugated cardboard
No electronics are required
We are ALLOWED to meet to design and build the individual parts of the structure before the session and assemble them to form the finished structure during the practical session.

Before Practical 4 this is what we do...:
A week before the practical, my team and I had a meet-up to plan our design.
Before that meet-up, we researched videos online for inspiration.
We then came across two videos that we were keen🤩 on making.

On how to make a Pulley:
On how to make the spiral and the track:


The mechanism we chose to use is a double crank locomotive mechanism which has been primarily used as a coupling between two parallel non-inline shafts generating nonuniform motion of the driven shaft. This non-uniformity of the continuous output rotation makes the double-crank mechanism a versatile input source.

Design Sketches
My Group's Finalised Design:

At first, we didn't apply what we learned in practical 2 until Mr. Ting reminded us and told us before Practical 4.
Therefore, we used what we learned in practical 2 on cardboard joinery and used it to apply in our game design
The cardboard joinery we used are slots, L-Brace, tabs, holes, and skewers.
With the help of the cardboard joinery, we were able to use them instead of using glue.

Mechanism (will be joined with a connecting rod behind the spiral base):


Photos📸 of the working process
Gluing the spiral to its cardboard base:

Gluing the sides of the slope:

Gluing the slope to the back of the spiral base:


Funny pics of my groups:


FINAL Product

The back of the Mechanism

The Pulley in the box


Video📹 of the product in operation

So guess what my group's product was not really successful but we overcome our problems in the shortest period so overall our group did a very good job🎉🎉

Initially, we were concerned about the crank as we can only use cardboard materials to make the product and for the fixed link we had to use cardboard materials instead of a string.
The crank failed at first and it was because the width of the cardboard that replace the string was too big.

Then for the second try, we shorten the width of the cardboard and it WORKED💪🏻💪🏻

To my dearest SP STUDENTS, I NEED REALLY ALL YOUR HELP...
If you like my group's cardboard design and want to see it function,
visit the lab at W319 and please vote for us🙏🏻🙏🏻
Thanks for reading my blog!😎Hope you all will like, share and subscribe to my blog for more amazing content from this ICPD modules and with my team!🤩Stay tuned for my weekly blog!!!🤗


Comments